Introduction to Items
Items in Unturned encompass anything that can be carried in a player’s in-game inventory. All items will share certain properties, but each item type may have its own unique properties as well. Please refer to Asset Definitions and Asset Bundles for the full documentation regarding assets and asset bundles.
Game Data File
GUID |
32-digit hexadecimal |
empty |
Refer to GUID documentation. |
Type |
enum ( |
empty |
Item’s class. |
Rarity |
enum ( |
|
Rarity of the item, as text shown in menus and colors used for highlights. |
Useable |
enum |
|
Class for how to treat equippable items. |
Slot |
enum ( |
|
Which equipped item slot the item is valid to be equippable in. |
ID |
uint16 |
|
Must be a unique identifier. |
Inventory Properties
Size_X |
byte |
|
Width in inventory, in slots. |
Size_Y |
byte |
|
Height in inventory, in slots. |
Size_Z |
float |
|
Manually specify orthogonal camera size for item icons. This directly corresponds to the value of a Camera component’s Size property in Unity. |
Use_Auto_Icon_Measurements |
bool |
|
Automatically calculate axis-aligned item icon camera size from bounds. |
Can_Player_Equip |
bool |
See description |
Item can be equipped by the player. If the |
Can_Use_Underwater |
bool |
See description |
Item can be used while underwater. If the |
Should_Drop_On_Death |
bool |
|
Item should be dropped on death. |
Allow_Manual_Drop |
bool |
|
Item can be manually dropped by the player. |
InspectAudioDef |
empty |
AudioClip or OneShotAudioDefinition to play when item is inspected. |
|
InventoryAudio |
See description |
AudioClip or OneShotAudioDefinition to play when item is picked up, moved within the inventory, and dropped. Default value is dependent on the child asset. |
|
Procedurally_Animate_Inertia |
bool |
|
Whether viewmodel should accumulate angular velocity from animations. Useful for low-quality older animations, but should probably be disabled for high-quality newer animations. |
Equipable_Movement_Speed_Multiplier |
float |
|
Multiplies character movement speed while equipped in the player’s hands. If a gun is equipped, then any gun attachment multipliers are combined as well. |
EquipAudioClip |
|
AudioClip to play when equipping. |
Economy
Size2_Z |
float |
|
Orthogonal camera size for economy icons. |
Pro |
flag |
n/a |
Specified if this is an economy item. |
Shared_Skin_Lookup_ID |
uint16 |
See description |
Share skins with another item. Defaults to item’s |
Container
Amount |
byte |
|
Maximum capacity for container-like items, such as ammunition boxes. |
Count_Min |
byte |
|
Minimum amount to generate, for container-like items. |
Count_Max |
byte |
|
Maximum amount to generate, for container-like items. |
Quality
Quality_Min |
byte |
|
Minimum quality to generate. |
Quality_Max |
byte |
|
Maximum quality to generate. |
Should_Delete_At_Zero_Quality |
bool |
|
Item should be deleted when at 0% quality. |
Override_Show_Quality |
bool |
|
Override to forcefully show item quality. |
Miscellaneous
Backward |
bool |
|
Set the item to be held in the non-dominant hand. |
Bypass_Hash_Verification |
bool |
|
Disable hash verification check, and allow for mismatched files. |
Destroy_Item_Colliders |
bool |
|
If false, colliders are not destroyed when the “Item” Prefab is attached to the character. For example equipped vanilla guns do not have any colliders, but some mods (e.g., riot shields) may have relied on child colliders not being destroyed. |
EquipablePrefab |
empty |
Overrides the model spawned when this item is equipped. For example, the “Equipable” Prefab could use an animated skinned mesh component while the regular “Item” Prefab only needs a static mesh component. |
|
Ignore_TexRW |
flag |
n/a |
Specified if read/writeable texture errors for the asset should be hidden from the error logs. |
Left_Handed_Characters_Mirror_Equipable |
bool |
|
If false, the equipped item model is mirrored to counteract the mirrored character. |
Instantiated_Item_Name_Override |
string |
See description |
Name to use when instantiating “Item” Prefab. By default, the legacy 16-bit asset ID is used. Since Unity’s built-in Animation component references GameObjects by name, this property can help share animations between items. |
Use_Auto_Stat_Descriptions |
bool |
|
If true, properties like damage, storage, health, etc. are appended to the description. |
Blueprints and Actions
Items can have crafting blueprints and context menu actions. Refer to Blueprints and Actions for documentation.
Unity Asset Bundle Contents
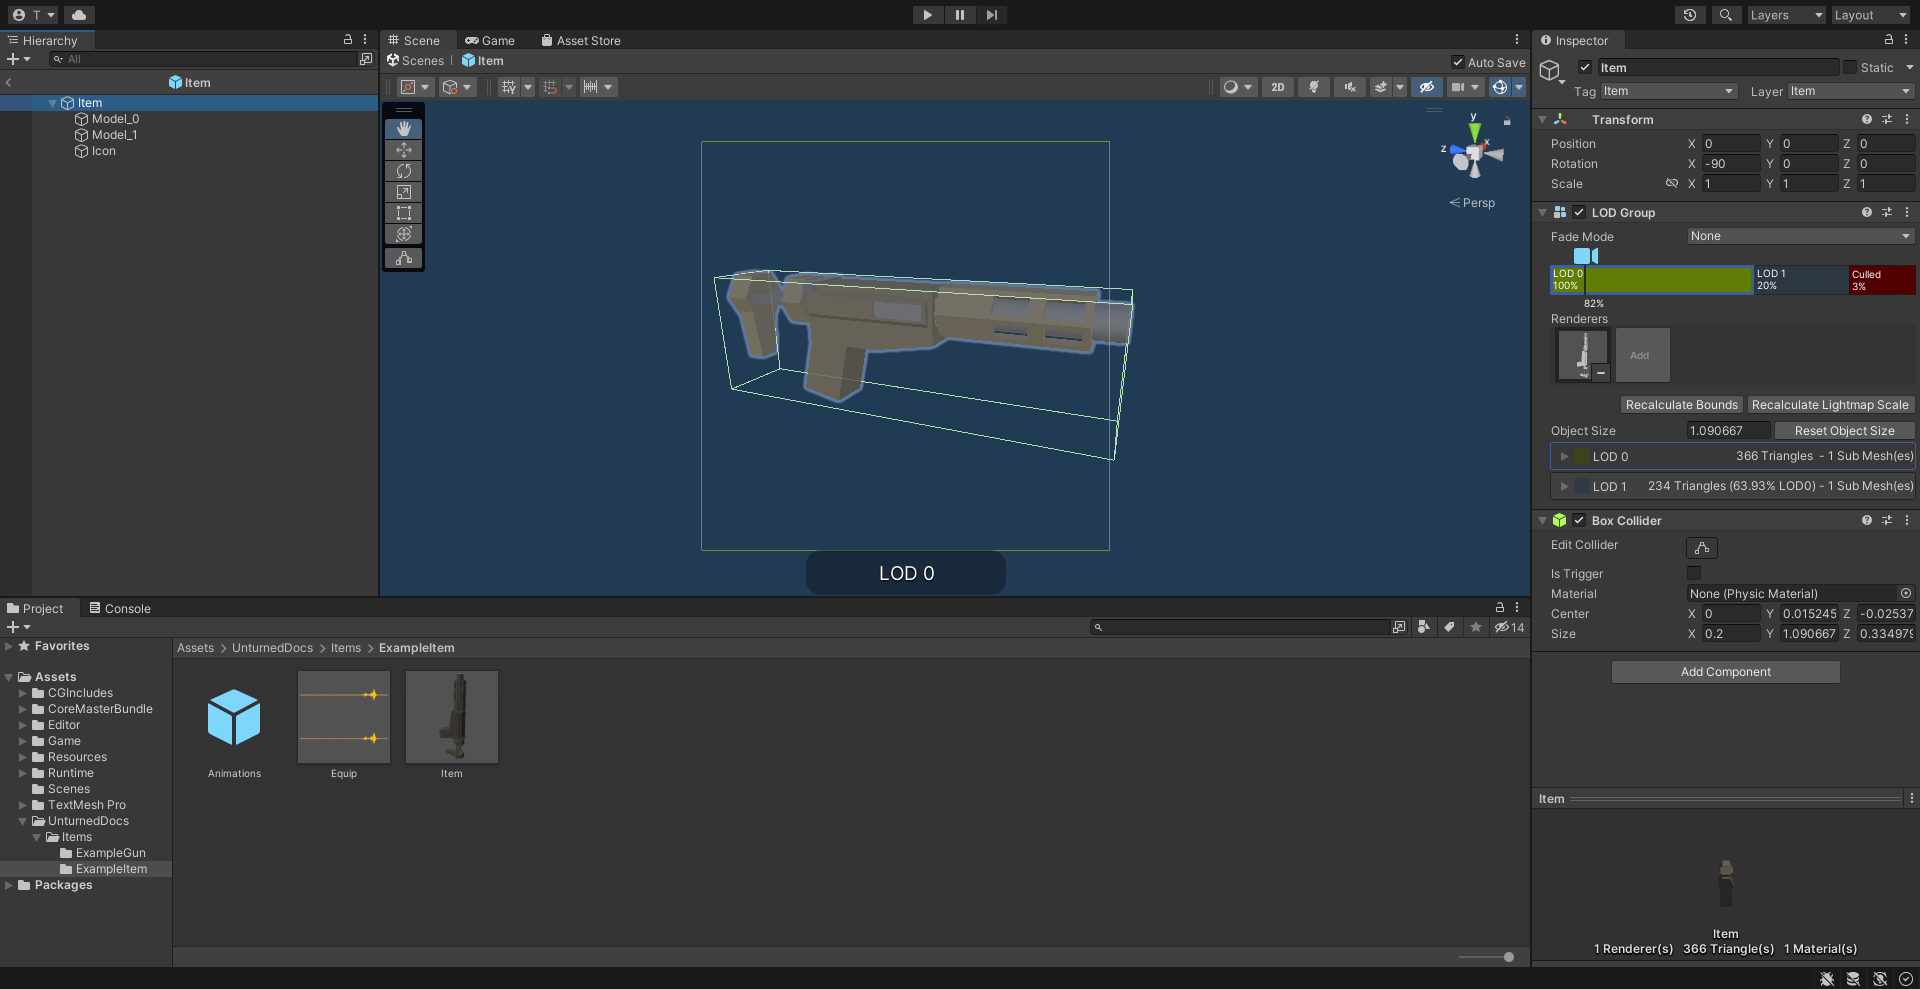
An example of an item being set up in the Unity editor.
To get started, create a new folder for your custom item. The name of this folder will be relevant when further configuring your item after it has been exported from Unity.
Item (Prefab)
Inside this folder, create a new Prefab named “Item”. This should be tagged as 4: Item, and layered as 13: Item. Open the “Item” Prefab.
Items can have multiple colliders including different types, but just attaching a Box Collider component to the root GameObject will usually suffice. It is recommended to use a minimum dimension of (0.2, 0.2, 0.2), because the large colliders are less likely to fall through a thin surface in a single physics tick.
If your item only has one LOD, you can attach Mesh Filter and Mesh Renderer components directly to the root GameObject. Configure these components as desired.
It is recommended to have multiple LODs for your item, so that less needs to be rendered when the item is far away. If your item should have multiple LODs, attach a LOD Group component to the root GameObject. Create a child GameObject for each LOD, named “Model_#” (e.g., “Model_0”, “Model_1”). Attach the Mesh Filter and Mesh Renderer components to each one. Configure these components as desired.
Add a new child GameObject named “Icon” to the root GameObject. This will be used to draw an icon with an orthographic camera. By default, the game will automatically calculate the position and size of the camera – so the only thing that needs to be configured is its orientation. To test the orientation of your icon, temporarily attach a Camera component with its Projection property set to “Orthographic”. When satisified, delete the Camera component.
Animations (Prefab)
For equippable items, a Prefab named “Animations” is required. The Prefab and the animations included can either be created from scratch, or they can be duplicated from the provided Unity packages.
If you have installed the ExampleAssets.unitypackage we provide, you can find the vanilla animations for most item types in the game. Prefabs can be found along the CoreMasterBundle/Items path, while the raw animation files can be found along Game/Sources/Animations.
To create the Prefab from scratch instead, add a new Prefab named “Animations” in your custom item’s folder. Add an Animation component to the root GameObject of the “Animations” Prefab.
Every equippable item should have an animation named “Equip”. If your weapon should be inspectable, it should also have an “Inspect” animation.
Equip (Audio Clip)
To have a sound play when the item is equipped, include an Audio Clip named “Equip” in your custom item’s folder.